Showing posts with label Animation. Show all posts

Thursday, August 12, 2010

Going Digital Saves You The Pain of Trashing Stuff

Phew, it feels good to be back on the ol' internet. For a couple months I was on a little work hiatus. As in a hiatus from being on the internet because of work. Not to be confused with a hiatus from working, or the 1954 B-Movie Hiatus From The Black Lagoon.

So now that I have nothing going, what better to do than blog.

I took a little break and went back home to Maryland. My parents requested I clear out some of the mess I've accumulated in the basement storage room, or they'd call whoever cleans up the houses on Hoarders. During my digging and crying, I ran across a couple boxes worth of animation.

This represents only a fraction of For Tax Reasons' work. I think some of IM IN UR MANGER is in there, the heads from the G.O.P. P.S.A.'s, and part of my Got My Number music video.

It's almost as tall as Marley! And would be even taller if Matt and I didn't cut so many corners when we animate. Of course, if we didn't cut any corners, we'd probably only have two shorts online.

I kept a few of the drawings, but threw most of them into the recycling bin. They're all scanned and saved on various hard drives; pretty pointless to keep around. Even if I became ridiculously famous in some bizarre twist of fate, nobody would ever want the majority of these drawings. Since Matt and I work with so many layers and libraries, they're mostly bodies without heads and random arms:


The only way someone would EVER want those drawings is if I become a crazy eccentric billionaire- and after I die Sotheby's auctions off my state and includes them in some 2 for 1 deal with a real live genetically engineered Centaur. Only then would somebody MAYBE want those drawings. Fancy auctions do 2 for 1 deals, right?

As you can see, I work hard to validate my decisions to toss anything.

Tuesday, May 12, 2009

How We Animate: Part II: The Software & The Method

Exactly three months ago, I had written a long ass blog post, which I never got to post, about the For Tax Reasons animation process. How we went from paper to digital with out the aid of Cintiq's. But then we ended up buying Cintiqs, and our process was turned on it's heads.

Anyways, so I'm going to post about our old method, because this is the internet- and the internet is for sharing information, and maybe this can help somebody out who wants to work on paper but still produce a sharp and clean animation.

So, with out further ado, the man with a million voices- "How We Animate" Part II. The process of taking animation on paper and putting it into a computer.

HOW WE ANIMATE(D): PART II: THE SOFTWARE & THE METHOD

Teh Warez

These are the programs you'll need.

Adobe Photoshop, for scanning, cleaning and coloring
Adobe Bridge/Adobe Illustrator, for cleaning (you're going to need at least version CS2 so you can use the Livetrace tool)
Adobe After Effects, for sequencing and compositing everything together
Final Cut Pro, for editing together each shot

So this software is kind of expensive, but I found this one website which has some really good discounts on it. So go and check that out if interested in trying out this method.


Step 1: Scanning
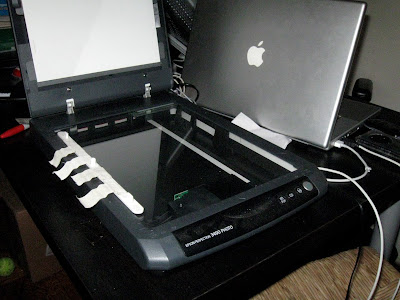
So first things first, Windex your scanner real good and tape a peg bar to it. This is how you're going to keep all of your drawings registered to one another. Remember, you're going to have to keep that peg bar taped in the same place, and use the same scanning marquee until you finish scanning a shot. So if you need to use your peg bar for something else, like stirring some lentil soup your making- go do that first, and then tape down your peg bar.

Do a preview scan and select the area which encompasses the entire shot and maybe a little more. It sucks to scan 80 drawings and then realize the last one is outside of your scaning area. Settings-wise. I suggest scanning everything at at least 300 DPI. It helps keep the detail for the Livetracing step later on, and if you ever decide to zoom in with a camera move things won't look shitty. If there are any level adjustments you can do no the scanner to improve your image go ahead and set them now, but most of your adjusting will be done post scanning.

So this is a good chance to introduce ACTIONS. Actions in Photoshop are going to be a huge help through this entire process. Open your Actions window, and click on the little menu thingy on the upper right hand corner to make a new action. Name your action, and then run through these scanning steps. Photoshop will record your each menu item you choose and everything, and later on, when you "play" the action, it will do everything automatically. Actions are big help for the whole process. So here's the scanning action:
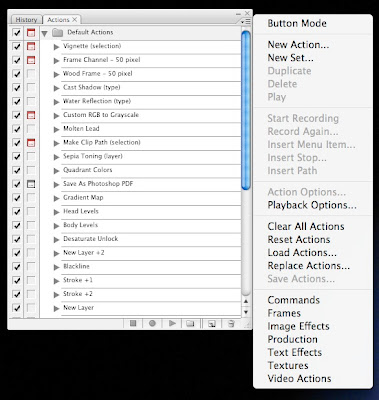

a. File > Import > (Your Scanner Name) TWAIN

You'll be routed into your scanners own interface, hit Scan. After it imports the image you'll be back in Photoshop.

b. Image > Rotate Canvas > 90ยบ Clockwise or Counter Clockwise depending what side of the scanner you're using.

c. Double click on the Layer to change it from a locked Background to Layer 0.

d. Then hit
⌘ Shift U to Desaturate the layer- or- Image > Adjustments > Hue/Saturation.

I do this because I don't need any of the color information, and it just takes up more memory.

e. Save your file. Now, to make a Save command appear in an action, you should go to your Actions menu, and select Insert Menu Item. Then choose File > Save.

For you newbies: Save it as a Photoshop file, not a JPEG, which would compress it and not allow for layers.

Now stop recording by hitting that little square stop button, and you've got your Scan action.

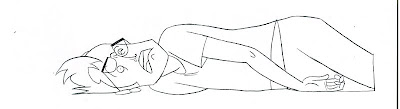
Here's what one of our scans looks like:
Step 2: Leveling(sp?)

So, you've got all your drawings scanned. Preferably in folder labeled Scans, in a sub folder labeled by shot number. I like to keep my raw scans around, just in case I screw something up. Now it's time to make those Scans look a little sharper by leveling them. Duplicate the Scans folder, and rename the copied folder "Clean".

It's time to use the Level tool in Photoshop.
( ⌘ L - or - Image > Adjustments > Levels)
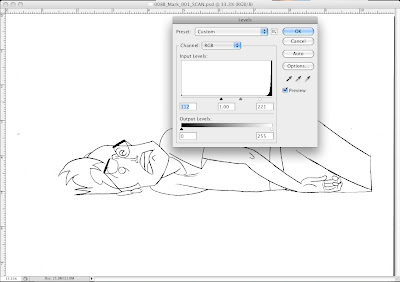
Drag the Black and White input arrows back and forth, and try to get the white of the paper to be white and the line to be as black as possible with out crunching the image like this:

Click on the image for the full effect.

When you think you've got a decent level which will work for the drawings- make a Level Action with those settings.

Now you can go to File > Automate > Batch and you can Batch level a whole folder of Photoshop files using the Action you just made.
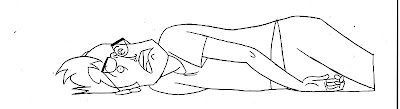
Step 3: Cleaning

This is where things get a little crazy. We're gonna use Bridge and Illustrator to vectorize the lines of your drawing. This is to get rid of the gray half pixels and make your lines more defined and solid black. This will really come in handy when you're at the coloring stage. When you're lines are sharp and solid black, you don't have to waste time zooming in and coloring over white specks by hand. I made a confusing post about this before, but I'll explain it again here.

Open up one of your leveled Photoshop files in Illustrator. Select the layer with the image on it, go to Object > Live Trace > Tracing Options.

Click the "Preview" button so that you can watch how Illustrator traces your image as you change the settings. These are two of the settings I use.

This for a more rounded approximation, but smoother line.
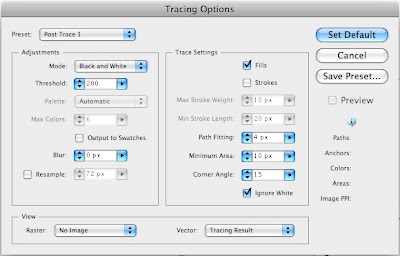
And this for a closer match to your pencil line, but rougher.
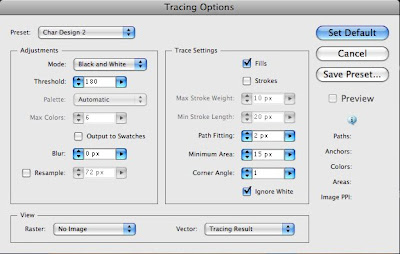
You might have to tweak these settings to fit how you're drawings look. It's not perfect, but it really helps the quality of your final image, at the sacrifice of some details. Like these little Flash looking lines the computer makes.
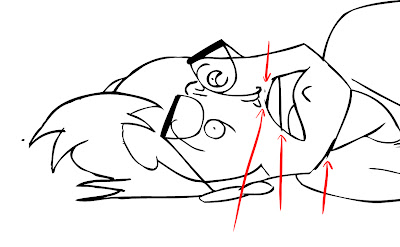
Once you've figured out a setting which works with your scans. Open up Bridge. Select your Clean folder. Go to Tools > Illustrator > Livetrace
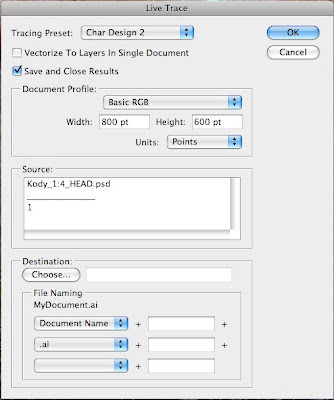
Select your Preset, Basic RGB and Choose your Destination.

And BOOM Bridge will Livetrace the whole folder for you. See, not that hard.
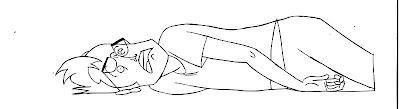

Step 4: Almost Coloring

Now you've got a Clean folder full of AI (Illustrator) and PSD (Photoshop) files. Copy those AI files into a new folder called "COLOR". You're going to bring these Illustrator files BACK into Photoshop to color them.

Open up Photoshop and import the .ai files. Make sure you're importing at atleast 300 DPI, and using the Media Box, not the Bounding Box as your selection area. I dunno, Illustrator is weird with it's boxes. Sometimes you also have to rotate your page set ups in Illustrator too if things are like coming in tall ways and they should be wide ways. You'll figure it out.

Save, these new PSD's. These are what you're going to color and stuff. But coloring of course is another post, because this one is all ready way too long.

THE END FOR NOW

So, that was our process for getting a scanned drawing to have a clean sharp line for easy and quasi-professional looking color. This was our work around for both: not having the skillset for drawing directly into the computer using Wacom tablets, and not having the advantage of the more expensive Cintiq, where you can draw directly onto the screen. In some upcoming posts I'll talk about how we color, and how it's been working on Cintiqs. Until then, I'm gonna shut the fuck up cuz this is way too much writing.

Wednesday, March 4, 2009

How It Goes

So I took a trip to Boston this past weekend, if you can't tell by the HUGE DROPKICK MURPHYS MURAL that I'm standing in front of. I was also in Allston, and was hoping to see somebody from Big D in the Kids Table wandering around. But I just heard rave music instead. That's all I know about Boston the music scene I guess. Dropkick and Big D and that everybody there was or is in a hardcore band. I gotta find that city where everyone was or is in a ska band. When I do, I shall look upon that city and I shall whisper it's name into the dusty wind- Skaheaven. Or I guess it would be Skeaven. I don't know. But yeah, Boston is a pretty sweet place.

Anyways, like I had written before, the people at the Boston Underground Film Festival had been kind enough to invite me up to screen some of my materials with animator Patrick Smith. It was lots of fun, always interesting to see people react to all the For Tax Reasons material in real life. So I have to give a big thanks to Anna and everyone at BUFF and Amy and everyone involved with Space 242 for showing my stuff and putting me up. I hope they'll have me back someday.


So, we've been getting some pretty good reactions to the new short which is real nice considering the stress we had put ourselves through to get it done and uploaded. In fact, just uploading it was a like 6 hour ordeal. We had been rushing through the whole process, trying to get it done early that week; didn't have the time to go over each shot with a fine toothed comb. The result- a whole lot of rendering, realizing we had missed something, and then going back to rerender. I give you the actual gchat conversation between Matt and I the day we were trying to upload the short to Youtube.What you see is me rendering out the final shots from After Effects, putting them into Final Cut, exporting the full short from Final Cut to a Quicktime, compressing that Quicktime for upload to Youtube- THEN realizing I had missed something and going back to After Effects. And of course complaining to Matt about it the whole time.

This went on past 8pm. As you can see, at some point around 5:50 pm I had thought this whole thing was pretty amusing and started taking screen caps of the conversation, but
the novelty quickly faded away. Even after we had settled on a render, we were having trouble with Youtube because the several uploads that we had cancelled had mucked up the system, preventing our final upload from fully processing.

But whatever, we got it up there eventually and people really latched on to it, which was great. I mean, as far as the content was concerned, we thought it was pretty good. And as I've said before, Tim Martin and Emily Tarver, who provided the voices for Hank Henderson and Agent Wilkins, both did an awesome job. Their reads and improvisations is what made this short funny.

Visually however, we thought we had fallen short. We had spent so much time with Episode 2.5 crafting these backgrounds and trying to really utilize the great perspective possibilities of a parking garage. But when we moved forward to Episode 3, we had arrogantly decided "Oh, this is simple, it all takes place in a small room, no problem". The boards we really rough, and I ended up just eyeballing most of the background drawing.
The result was some wonky shots that had to be reworked into these very boring, straight laced shots. Some garbled perspective. And a general disappointment with our lives and what we had become as human beings.
The room was small, but the scene was supposed to be dramatic and intense. We could have made the angles more interesting, and given more depth to this thing which would have better serviced the dialogue and voice acting. But you know, the good thing about making mistakes is that you learn from them. And we've learned, twice over, that you have to make decent storyboards, and pay attention to composition and perspective.

Hopefully we will impress ourselves with the next short. I don't know why I wrote all this, I just wanted to post that gchat conversation.

Wednesday, February 25, 2009

This Is My Life (And It's Ending One Minute At A Time)

FINALLY. Episode 3 of Ronin Dojo Community College DX: The Digital Pirates of Dark Water Saga is DONE!

In this installment, the Fed's have Mark and Barry in a corner with enough evidence to put them away for however long they put you away for pirating a shit load of movies. But a special guest inadvertently comes to their rescue. Nobody puts Barry in a corner!


This one had a lot of trouble behind the scenes. The past three days have had Matt and I up until 5 and 6 in the morning, trying to rush this thing together. I'll post more on that later, but for right now I have to thank the peoples who made this cartoon more awesome than we could.

Big thanks to Tim Martin and Emily Tarver for doing the voices of Hank Henderson and Agent Wilkins. They both have been real good sports about recording in our shanty town style bedroom studio, and always help us come with good lines on the fly. That porcelain city bit- all Tim.

Thanks to Darrell for offering his help in scanning and cleaning all of our shitty drawings.
It's one of the lesser glorious tasks in animation but his help made all the difference.

And thanks to Dan for helping us pull some SFX and Andrew Kudlick and Jonah Beram- we're going to keep reusing the animation you made for us- FOOOREVER.


And to repeat my previous post, Matt and I will be in Boston this Friday and Saturday for a screening the Boston Underground Film Festival is putting on. It's called "New York Spawned A Monster" and it features the animation of famed indie animator Patrick Smith and- me. There's a screening from 6pm-8pm at Space 242, and a Q&A at noon on Saturday at the same place. It's free but you have to RSVP. So come on down, or up, depending on where you live.

Ok, done hocking shit. Here's the Indiana Cat poster Matt put togther. Click on it to get a huge version for your desktop.


Sunday, February 8, 2009

I've Got A Black Hole In My Mind

I've been working on a music video for the awesome pop punk band, Teenage Bottlerocket, and things are starting to come together. I scanned in some of my work to do a little lip sync test. Check it out.


While making the Ben Weasel music video, I discovered that animating the lip sync for a person singing requires a more than my standard set of 10 mouths I use for speech. Talking is relatively fast, so I can get away with popping between mouth shapes with little notice of the change. However the drawn out movements of singing require a few inbetween's here and there to make everything look smooth. So I draw one AH mouth and then a slightly smaller AH mouth to cushion the mouth movements. Several varying sizes of OO mouths, and so on and so forth.

It's not perfect, but it works ok, and I need to cut all the corners I can when I'm making this thing on my own.

Anyways, here's a head pencil test I did of Ray nodding his head along to the music. There's no music in the clip so you can just imagine him nodding along to anything. Maybe a song, maybe a school presentation you're working on about the Marshall Plan or something. I don't know, go nuts.


Monday, February 2, 2009

How We Animate: Part I: The Equipment

My inbox and the For Tax Reasons inbox have received a lot of emails asking about how we do our animation. "A lot" being a relative term. We've gotten more spammy notices about Comicon than questions about animation in our For Tax Reasons account. But whatever. I thought I'd do several posts about How We Animate. I decided not to say "How To Animate", because I think that's a bit too forceful if not completely arrogant. There are a lot of ways to animate, we're always looking to streamline and perfect our process- so the For Tax Reasons method is neither preferred nor perfect. It's just what we get away with. So if you can accept that into your heart- then we can begin.


The Equipment

Drawing Utensils. For the initial drawings, I use Col-Erase erasable colored pencils. They allow you to rough out out drawings and discern between multiple layers, and then roughly clean up with a black line over top. I sometimes use 2 HB Mirado Black Warrior pencils for the clean up, but lately I've been experimenting with these Rapidomatic mechanical pencils. They help me keep a thinner and more consistent line.

Peg bar.
In order to keep each drawing "registered" with one another, or in the same place, you're going to need specially punched paper that fits to a specially molded peg bar. These can be hard to come by in a brick and mortar art store. In NYC, I get mine from the the New York Central Art Supply, but you can find them online. Just do some searches. I use the plastic Acme peg bars.


Hole punch. These things can be fucking expensive. Most of these items, aside from the computer stuff, you can get for decent prices. But animation hole punches are such a niche product, so they always seem to be high priced. CartoonSupples.com/Lightfoot Ltd. has one for $599. There might be some cheaper ones out there, maybe on eBay. I'm lucky enough to be borrowing one from a co-worker.

The upside to having your own hole punch is you don't have to wait for a ream of punched paper to ship. And when you're pretty lax on stocking supplies like myself, it really helps to have a puncher at your side.

Paper. So if you don't feel like shelling out 600 bones for a punch, you'll have to buy pre-punched paper. (I could make a link again to Cartoonsupplies/Lightfood but I'm not sure if they have the best prices for punched paper).

If you're going the hole puncher route- any 81/2x 11 copy paper will do. I usually buy recycled, even though it sometimes has a rougher grain and some more flecks in it. It's worth it, planet wise, since I've resisted the jump to the paperless animation route- mostly due my lack of skill on a Wacom tablet and the expense of
Cintiqs.


Lightbox. You might be able to find Light Tracers and Porta-Trace's at some art stores around town since people can use them for photography and making stencils and stuff. If you search for these things on Amazon, they come up in weird categories like Home Improvement or Home & Garden. Strange.

I've got a Porta-Trace light box with two lights in it. It's great for seeing through 3 or more drawings, and I like not having a pegbar molded to the drawing surface. It gives you more free space and flexiblity. However, there are some great swivel light boxes that allow you to spin around your drawings; simulating a full on animation desk. Those are great for cleaning up. It's easiest for me to draw downward strokes, so having that option of spinning the drawing around so that I making the same general hand movements is great. It's a personal preference in the end.


If you're good with crafts and DIY building, you can make an animation desk with wood, a sheet of plastic and some flourescent lights. Works just the same. And you'll be much cooler or doing it on your own.

Camera & Tripod. To do pencil tests, you're going to need a tripod and any video camera that can send a feed to your computer. I use an old camera hooks up to my computer via firewire, and run the pencil tests using the demo of a program called FrameThief. I talk a a little bit about pencil tests in this blog post.

Scanner. Stores like Best Buy and the dying Circuit City barely have a selection of scanners that aren't those bigger print/fax/scan in one deals. It's kind of sad how electronic stores have turned into giant cell phone kiosks and TV dealers. Anyways, don't buy H.P. scanners. I'm sure they're just as high quality as any other scanner, but their scanning interface sucks.

Even if you're using Photoshop, you have to capture a scan via the scanners own interface. Since you're scanning hundreds of drawings, that have to line up with one another, you're going to want your scan marquee and settings to be the same each time- so you can just keep hitting SCAN. With the H.P. interface, the scan settings reset each time. If you want to save your scan settings, you have to make a little scan profile and load it each time you scan. It's just an extra, annoying step, and you've already got enough clicking to do.

I use an Epson Perfection. It's Advanced User interface allows for a good amount of tweaking, it saves the most recently used scan marquee and doesn't create some blown out auto setting each time you preview a new scan.


Microphone. If you're going to record dialogue for your shorts, you might want to invest in a semi decent microphone. I went down to Guitar Center and bought this AT4040 Cardioid Condensor mic at the advice of some sound engineers at my work. It's been working well for me, but I'm sure there's a myriad of models that'd do just fine.


MBox2 Mini. This piece of hardware allows you to record and edit in Pro Tools LE. It's the cheapest and smallest of their systems, but does in no way lack in quality. If you really need to, you could probably record using some shareware programs, like ones for podcasting, to capture and roughyl edit audio. I know that Final Cut has a Voice Over tool you could probably use to the same end. However Pro Tools is premiere audio program, and I make everyone do a billion takes and like to throw fancy ass compressors on my tracks to sweeten them up like sugar- so it's good for me.

Computer. Sorry Luddites, you're gonna need to borrow or buy one to do what we do, and it should probably be a Mac. I come from a Mac Family. Even though we started with a Commodore 64 (moving next to an archaic orange text on black screen laptop, then an Emerson IBM Compatible) we eventually made the switch to Apple and never looked back.

It was part of an entire childhood and adolescence as the secondary option underdog. I was a Jew, who owned a Sega Genesis and had Mac computers. How much more of an outcast can you get? My people suffered for years. I was persecuted in C++ class. The PC kids wrote "SMACK THE MAC" in binary on the white board. It was traumatic, but I made it through. And now I can stand proud and tall without fear of ridicule for my Apple Heritage. Complain about coffee shop hipsters all you want- we have survived.


Books. Ok, the last but most important part. If you're going to make animation like we do, you're going to need to LEARN TO ANIMATE. I can't go into detail on how to do that, I'm not smart enough. But if you want to learn, check out these books:

The Animator's Survival Kit by Richard Williams
Cartoon Animation by Preston Blair

Or Animation Meat, as Smo pointed out to me. Other blogs and forums have some notes and practice stuff posted on them, all from much more reputable sources than myself. So search those out too.


Ok so that's part one. Sorry it was so long. The next step will be about scanning, cleaning and coloring your work. So look out for it soon. And sorry for all the unintentional product endorsements. If anyone asks, I told you to steal everything.

Everything but the peg bars.

Monday, January 26, 2009

Episode 2.5!

Check it out folks, it's RDCCDX: The Digital Pirates of Dark Water Saga- Episode 2.5: "Parking Garage Diplomacy".


Oy vey, this was supposed to be a short little mini episode we could easily churn out, but it turned into some Deep Throat-CSM-Work-a-Thon for Matt and I.
But hey, we said we'd release it Monday. I hope somebody noticed that, because we really were working hard to stick to that deadline.

EDIT: Ok, now I got a second to breathe. A big thanks goes out to Tim Martin and Emily Tarver who did the voices as well as collaborated with us and Zack Scheer to make this little ditty. Episode 2.5 was a fun one to work on because it was fresh and new. All of the "full" episodes were written & recorded months ago, so the material feels a bit stale and old to Matt and myself. But for this one, we got to bring everyone into the room together to record and throw around ideas. It was a fun change of pace. We also got to experiment in the drawing department with some lighting and perspective. Even though it nearly drove me insane, I'm please with how the backgrounds turned out. Seriously, I felt like I spent an entire day trying to draw one background. I'll post them later on, I'm too tired right now. I'm going to go eat a banana.

Friday, January 23, 2009

Everything I ever wanted to know about perspective drawing I learned in junior year of college and then forgot

Before I begin this post I must state that I am in no way an expert or even at perspective drawing. But after a marathon session of drawing, and then complaining to Matt while he was trying to watch wrestling, we both finally remembered some of the basics that the incomparable Matt Sheridan taught us in college. I thought I would share my meager knowledge today.

So, this is how you figure out proportions of equidistant crap in perspective. I'm talking about like, if you're drawing a row of doors down a hallway or telephone poles disappearing into the desert horizon. That's the classic example they use in drawing classes- for some reason. I'm down with it; something romantic about the American Southwest indeed. Anyways, for my purposes I'm drawing cement poles in a parking garage, since that's where the next mini episode of RDCCDX: The Digital Pirates of Dark Water Saga takes place. I had to figure out where to place all these poles in a manner that looked like they were equally space apart yet getting smaller in the distance. Here's how I did it, and how you can do it- in 6 easy steps.

Step 1: get yourself a vanishing point. Most art stores carry them- some places online sell them in bulk. Don't worry about brand, they're all the same. So you get some vanishing points. If you're doing one point perspective, put down, one- if you're doing two point perspective- you put down two. Since I'm a simpleton- I did one point perspective. So here goes my dot.
Phew. Ok. Step 2: lay out your horizon line (the line in red there) and then make two lines for the angle of the stuff your drawing. In my case, these purple lines marked where I wanted the tops and bottoms of the cement poles to go.
Step three- draw some vertical lines. I drew where I wanted two of the cement poles to go.
Ok, so at this point I was like "Man, I think these poles are spaced too far apart, I need to draw a pole in between these two- but HOW?". Conventional widsom says, just find the halfway point between the two verticals. Well, conventional wisdom is wrong- cuz you're in the twisted world of perspective- up is down, black is white, god is dead and geometric algorithims rule with an iron fist. So what do you do? Step 4: Draw an X between the two verticals.
The center of that X is the halfway point between those two verticals. Amazing! But shit, I wanted to draw some more poles. You know like, ones going far into the distance, how do I figure out where thos are? I have nothing to make an X between- WHY IS LIFE SO CRUEL!?

Step 5: Draw a line from your vanishing point- through the center of your X. In my case it was pretty close to the horizon line, so I'll just use that again.

Step 6: Draw a diagonal from the top of one of your verticals through where the center line meets the next diagonal. Where that line touches the bottom diagonal- is where your next pole would go. It sounds complicated, but it's not- I'm just really bad at explaining things. LOOK AT DRAWING!
You can keep doing variations of this X/diagonal method to figure out where things should go. For this drawing I kinda winged some of it, but the used that whole technique as a basis for laying it all down.
Man, that took a while. And I got 5 more to go. Woo and a hoo. The next RDCCDX mini episode is coming out this Monday. Be ready and keep watching the medicine cabinets- KEEP WATCHING THE MEDICINE CABINETS!

Wednesday, January 14, 2009

Back to (the) drawing boards

Matt and I started drawing boards for Episode 2.5 and Episode 3 of Ronin Dojo Community College DX: The Digital Pirates of Dark Water Saga. 2.5 proved to be particularly difficult, as it takes place in a parking garage. It's a great location, with all sorts of cinematic possibilities-angles and perspective and repeating patterns vanishing into the distance and all sorts of other things which are hard for me to draw.

In these cases, photo reference is key- and the internet is the lazy animator's god. There was a beautiful spread of photos of vast, empty parking garages on Flickr. But even with an array of moody photos at our fingertips, it was still hard to turn the space around in our heads and fit things to what we wanted. If this weren't for a minute long piece, we'd probably have to haul our asses out to a Home Depot or something.

In other news, I've started experimenting with brushes and inking. I've been kinda frustrated lately, wondering why my drawings never look smooth and sweet like everybody elses. And I guess reading Bone was the last straw.

I went out and bought some small water color brushes, india ink and a pad of vellum. Not sure if these are the right tools or not, I was just kinda winging it on some advice my friend Kudlick had given me. So, here's a new Ronin Dojo t-shirt design I've been working on, which I inked with a mix of brushes and Micron pens.


I was mixing the brushes and pen out of necessity, my hand isn't steady enough to make thin details with a brush. However when I found Youtube vids of Jeff Smith and Jim Lee doing it too, I realized it was kosher and felt a bit better about myself. I really have no concept of how professional people go about things, cut me some slack.

Anyways, now I'm gonna go paint with some smashed berries.

Monday, December 15, 2008

Some Updates From the Front

Matt and I have been clickin' away at the second episode of RDCCDX: The Digital Pirates of Dark Water Saga. I finished all of the drawing up this weekend, and we scanned, cleaned and roughly composited everything in one day. If we get lip syncing, coloring and sound done this week, we should be posting the episode by next Monday.

So here's a glimpse of a couple of the characters appearing in the new episode. Here's the cleaned and colored head rotation of Agent Wilkins, who I previously posted about.


It's kinda scary when they're rotating and yelling. And here's another dude's head, I think this one turned out pretty good- nice stretchy mouth moves.


I bet that guy is from Chicago and buddies with Carl Winslow.

More updates coming soon.


"It's a rare condition in this day and age to read any robot rights on the newspaper page."

Monday, December 8, 2008

Pencil Tests

So, I'm half way through animating the second episode of "Ronin Dojo Community College DX: The Digital Pirates of Dark Water Saga", and I thought I'd do a little update and post some pencil tests.

For those of you not in the know, pencil tests are when you shoot your key frames and roughs to test out timing or see how the movement is looking. For example, here's a rough pencil test where the character drops a spool of DVD-Rs and vomits.


Back in the olden days, like the late 1800's when animation was confined to giant daguerreotype flip-books of Confederate soldiers rotting on battlefields, they couldn't do pencil tests. But with today's technology, it's easy.

If you have a shitty video camera and a Mac, you can use a program called Framethief. It allows you to grab single frames from the camera feed and then play them back. The trial version is all you'll need if you're just doing pencil tests. If you're doing some stop motion stuff, you might need to get the full version so you can insert frames and stuff.

In college, we used these devices called Lunchboxes to do pencil tests, but they're really expensive and require a camera and monitor so you might as well not bother. I just mentioned them because the name is funny.

So for the new episode, I was working on this shot where a character walks while rolling up his shirt sleeve and grabs Barry. Generally, I try to keep my characters standing in one spot whenever possible so that I can save time on animating walks and runs and such. If a character must run or walk- I usually pawn the shot off to Matt. This practice has built up a phobia in my mind of animating any sort of foot movement, and as a result my characters move like they have their feet nailed to the ground. So when I got to this shot of a dude walking around and doing stuff, I got scared. This is how I coped.

First I video taped my self walking around and being angry, to see what exactly the movement would look like. I won't post these pictures because I look gross and ugly in them. So let's just pretend this is what those looked like.


Next I broke down the movement into key frames and shot a pencil test.


Then I did my inbetweens to fill out the motion.


I also brought the PICT sequence into After Effects to futz around with timing, and I put a camera move on the shot. I find that camera pans and the like can help smooth out limited animation.


And there you have it. I overcame my phobia, and it only took hours upon hours of work.


Ambrotypes & Robot Rights

Wednesday, November 26, 2008

241

Check it out, I got TWO pieces of news.

As I mentioned before, Matt and I were guests on the Otaku Generation podcast. Episode #181 is now up, so go listen to our incoherent ramblings. Big thanks to Alan, Bryce and Jefferson for having us on.

Ok, and second piece news, we animated a little mini RDCCDX episode to tie everyone over until Episode 2 of "Ronin Dojo Community College DX: The Digital Pirates of Dark Water Saga" comes out. Take a look:


Turkey Rights & Robot Rights

Monday, November 10, 2008

It has begun

Production has begun on episode two of "Ronin Dojo Community College DX: The Digital Pirates of Dark Water Saga", and if you can decipher this shitty chicken scratch of storyboard frame, you already know it's going to be ape-shit crazy.

We boarded everything out yesterday and made the animatic like every good little animator should before they run head first into the mind numbing tedium of making a cartoon. However this time around I've been trying something new with the way I set up each shot. I've been drawing the ceiling.

Even though Matt and I were pleased with how the first episode of RDCCXD:TDPODWS came out,
I didn't feel like I got a good sense of the space that existed outside of each shot. At first I reasoned that I had made the whole thing, so it was hard for me to step back and take it all in as an audience member. However the real reason was our failure to include solid establishing shots, shots that included high or low angles, and set ups that explored the space.

If you look at the short you'll notice that up until the Seth and Mark confrontation, pretty much everything is set up as if the camera was facing the store front, and most of the shots were just close ups or push ins of that basic set up. This was mostly done to save time.

But during the argument between Mark and Jerry we could have included shots where we saw the sidewalk and stores that were behind Jerry instead of the flat windows that he was standing next to. This might have given a better sense of where the store was and how the strip mall was laid out.

We also could have included slight high and low angles to our shots. Showing off the architecture behind the characters helps give a sense that they are near a three dimensional structure, or in a cubed room- not up against a flat wall.

This is what I've been trying to do with the set ups of episode 2. I've been drawing in the ceiling, and the angles of the room. My hope is this will give the audience a better sense of the space while still allowing me to use the library of heads that aren't drawn from low angles or high angles, which would include more of the bottom of the chin or top of the head respectively.

I'm still learning a lot about setting up shots and all of this crap, but from watching how other animators do their thang, I think this whole ceiling concept is something I should look into. I hate drawing backgrounds, they're really hard, and the less of them I have to do the better. But if I can make changes that would make our characters look like they're actually somewhere and not on a two dimensional stage that would be good.


Stalactites & Robot Rights